Traverse Forum banner

Overhead Console with HomeLink wiring diagram - Pics added!!!

43K views 28 replies 9 participants last post by  easytz  
#1 ·
I just bought an Overhead console that includes Homelink (not to mention sliding roof controles, etc.) for my LT1 (no On'Star, no Bluetooth, no Sat radio, and of course, no sliding roof(s)) so that I can use the Homelink in my new (to me) LT1.

What a shock :eek: - the connectors are different. Current is grey - maybe 8 pin and new on is green, maybe 16 pin.

SO - I could use a wiring diagram of both the Plain Jane overhead I have now, and the Homelink, etc. that I want to install so I can wire up the Homelink module and still have my overhead lights!!

Any ideas???
 
#4 ·
Re: Overhead Console with HomeLink wiring diagram

Well, I found (on Ebay) an Overhead Console with HomeLink and lights, no switches for Roof or anything else. Plugged into my existing wiring connector and PRESTO - I now have HomeLink and can open my garage door and security gate without remotes cluttering limited lower console area.

Works like a champ!!
 
#5 ·
Re: Overhead Console with HomeLink wiring diagram

Kemosabe said:
Well, I found (on Ebay) an Overhead Console with HomeLink and lights, no switches for Roof or anything else. Plugged into my existing wiring connector and PRESTO - I now have HomeLink and can open my garage door and security gate without remotes cluttering limited lower console area.

Works like a champ!!
Pics?
 
#7 ·
Re: Overhead Console with HomeLink wiring diagram

he probably meant pics of the install procedure. kind of a 'how to'.

so the lights automatically lit up huh.

Im sure some will want pics of the units backside to see the light bulbs. (prob LEDs)?
 
#8 ·
Re: Overhead Console with HomeLink wiring diagram

I purchased Kemosabe's first overhead console with the Homelink transmitter because I wanted to try and add the buttons which are lit, as compared to the 2010 models (except a few early build like rbarrios has) which had removed the lit buttons.

Our 2010 Traverse LTZ already had the Homelink, but being a later build did not have the lit buttons. The one I purchased from Kemosabe was from an earlier Acadia model (2007), so I figured it should have the lights. I removed the transmitter from our 2010, and saw the three prong connector to it only had utilized two wires. A black one for ground, and a red/white wire for battery power. Looking at and into the transmitter itself, there were no lights to be seen.

The transmitter from the Acadia had THREE wires in its connector. The same two as the 2010 model in the same locations, and the third which was gray. I could also see three LED lights inside the component. Hence, the circuit boards are not the same between the two model years, only because the earlier ones have the lights built into their circuit boards, and the connectors have three wires.

I swapped out the transmitters, putting the older one into the Traverse. I replaced the three prong connector with the two wires using the three prong connector with three wires from the Acadia. I spliced two of the wires into the already existing wires . I had to splice the third wire (gray) to obtain the instrument panel lamp voltage. There is another component in the overhead console which uses the same color wire also for instrument panel lamp voltage so that's what I tied into.

I now have Homelink buttons which light up when the instrument panel lights are on.
 
#10 ·
Re: Overhead Console with HomeLink wiring diagram

anyone take pics?

Well, if my old "signature" of Still Spinning at 33 1/3 RPM in an MP3 World gives you any hint, you'll know that I didn't take any pictures to post! Heck, I'm happy I can post messages!

Mechanical no problem, technology big problem. :D
 
#11 ·
Re: Overhead Console with HomeLink wiring diagram

First picture is of my original unit - lights only!

2nd picture is the back of the original unit - note empty spaces for microphones, sunroof switches, etc.

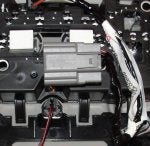
3rd picture shows basic grey connector. Other consoles with more features and switches have green color connector. The two connectors are NOT compatible.

Last picture is of pegs that snap into the roof to hold unit in place - no screws!
 

Attachments

#17 ·
Hey I know this is an older topic but there seems to be a lot of people wanting to add homelink. I had a hard time finding an overhead console with homelink on ebay and just recently I found the part number for it.

I just wanted a bare console so I could transfer all my current guts to the new cover and add a homelink unit I bought off ebay, gmoem.com has parts diagrams and that is how I found the number for my Outlook (Titanium 25978350 w/Sunroof w/homelink)

I ordered it from newgmparts.com, no VIN required, $50. It took a little while to for them to ship it, I think they had to get it from GM.

I hope this helps if you are still looking, sorry for no links I'm new.
 
#18 ·
I might be interested in adding Homelink to my 2009 Traverse, but not for $247. I looked on Ebay, but didn't see anything. If it's just a matter, of unclipping the existing overhead console on my LT1, and hooking up the gray connector as described by Kemosabe above and everything works, then I'd be very interested in doing that. Anyone come across any cheaper units then this one? Let me know, thanks!

http://www.newgmparts.com/parts/2009/CHEVROLET/TRAVERSE/LT/?siteid=213815&vehicleid=1444047&diagram=GM09365&diagramCallOut=1
 
#19 ·
Unless your wiring harness already has a clip for the homelink unit you would have to splice some wires to get power to the unit.

Here is a link to a console from a Rendevous $25, just take the homelink unit from that and buy a new cover transfer all the guts and splice 2 wires and now you have homelink for ~$100

ebay.com/itm/Buick-Rendezvous-sun-roof-switch-Homelink-OVERHEAD-CONSOLE-rolling-code-/400322953320?pt=Motors_Car_Truck_Parts_Accessories&hash=item5d351b8068&vxp=mtr

The rendevous uses the same homelink unit, GM part 10311606. gmoem.com/oem-parts/10311606.html

I don't know what color your interior is so I can't give you a direct link to the console, but on the following page its unit 01 (not K01, that has all the parts) find your color and copy the part number. the home page of newgmparts.com has a box for part number stick it in there and it should come up. 25978347 is for a titanium no sunroof, with homelink $53.84 part name comes up as cover.

NO SUNROOF
gmoem.com/lt_truck_chevrolet/2009/traverse_2wd_2009-2009/cab_and_body_parts_wipers_mirrors_doors_trim_seat_belts/2007_2010_nbsp_rv1_triminterior_roof_part_2_front_console_opener_ug1_exc_sunroof_c3u_nbsp_tr16_183.html

SUNROOF
gmoem.com/lt_truck_chevrolet/2009/traverse_2wd_2009-2009/cab_and_body_parts_wipers_mirrors_doors_trim_seat_belts/2009_2012_nbsp_rv1_triminterior_roof_part_2_front_console_sunroof_c3u_opener_ug1_nbsp_tr16_207.html
 
#21 ·
I know it's been a year since the last post on this but I'm a Newbie to the forum. I have a 2013 LT1 w/o Homelink but it looks to me that I could fit a Homelink transmitter from a Volvo visor to the space beneath the lamps. Can the bracket that is not being used by the microphone and sunroof switches be removed? If so it's a very cheap way of getting the Homelink. The Volvo transmitters are easy to remove and lighted. I have added them to several cars over the years.
 
#22 ·
I ordered the Overhead Console Cover from GM parts today, $53 and a Homelink transmitter (lighted) off of eBay for $15. I will swap the guts from my old console into the new cover (adding LED lights) and splice in the wiring. I plan on adding the smaller visor style Homelink to the old Console Cover and selling it.
Side note: Added custom built LED lighting to the Liftgate but chickened out trying to put the Courtesy Lamp Assembly down. Boy are they tough!
 
#23 ·
I am about to replace the Console Cover (Plate) in my LT with the Homelink version. It should be here Friday (GM parts, $53), I picked up a lighted transmitter from the local wrecking yard for $2.00. Does anyone know which wire is hot when the lights are on? I suppose I could splice the transmitter LED to the Orange Console LED.
 
#24 ·
I had posted some of the wire colors in this forum when I added the Homelink buttons with lights to my non-lit buttons. Check out this link, post #3 for my wire colors and what they do. This was on a 2010 LTZ which was a later build and did not come with the lights on the Homelink buttons as found on some of the earlier build 2010's.

http://www.traverseforum.com/index.php?topic=3473.0
 
#25 ·
Thanks! I had seen that thread last month but couldn't find it again. It should help a lot.
 
#26 ·
First of all I would like to thank Kemosabe & IS973800 for all the help they have given on this project.

The replacement Overhead Console Cover arrived on Friday and since it was a beautiful day here in Omaha I decided to not wait for the weekend. I picked up an almost new Garage Door Transmitter at a local wrecking yard last week. The Overhead Console Cover is part # 25978347, COVER-RF CNSL OPG *TITANIUM-58 and cost $55.99 plus shipping. Just about any Transmitter from a GM vehicle will work. Just look for the same shape buttons. I pulled transmitters from a Jimmy, 1500, Yukon, and Trail Blazer. They all look the same and all had LEDs (instrument lights). The rubber buttons come in grey or black. I used black to contrast with my grey (Titanium) interior.
Step by Step:
1. Wash your hands so you don’t get your headliner dirty. I like to program the Garage Door Transmitter before I test it. Check YouTube for HomeLink instructions.
2. Pull original Console down. Gently pull down one corner and work a screwdriver in so you can get a finger in. It’s tight but will come down with a little force.
3. Everything is powered from the one Grey connector. Note that there are more wires on the headliner side than on the Console side. Not all the wires pass through to the Console. Wires number 6 and 8 (below) will be needed to power the Transmitter.
The Console side of the connector has empty holes where you need pins. You could try to find the pins from another connector (auto parts store or junk yard). I decided to use a second connector (sub connector) to supply the Battery Voltage and Instrument Lights.
4. Swap the guts of your old Console to the new Console. This is a good time to replace the Courtesy Lights with LEDs. (LED’s are polarity sensitive so test them in the Console. I used a 9v battery.)
5. Install the Garage Door Opener.
6. Unwrap about 1 inch of the Console's wiring harness. Using a Quick Connect splice the Transmitter’s ground wire to the Black Wire from the grey connector.
7. If you are using a 2nd connector to power the Transmitter go to step 8.
If you installed pins in the # 6 and 8 slots of the grey connector, run a wire from pin 8 (Instrument Lights) to the center pin on the Transmitter’s connector. Battery Power (pin 6) goes to the Inner Most pin on the Transmitter. You are done and ready to test your new Console. Go to step 10.
8. If you used a second connector to power the Transmitter, be sure it’s polarized (can’t be plugged in backwards). Using 4 inch (#16 or #18) wires solder (or crimp) the sub connector and wrap with electrical tape. Make the Headliner side of the sub connector (female side) but don't wrap with tape yet.
9. In your vehicle, unwrap about 2 inches of the harness, use Quick Connects to splice to the #6 and #8 wires above the headliner.
10. Connect your new Console and test all functions. A darken garage is the best place to see the buttons on the Garage Door Opener, Instrument Lights on.
11. After testing wrap all loose wires with electrical tape. Install Console in headliner.

I took lots of photos of the installation but unfortunately get an error when I try to upload them here. (https://picasaweb.google.com/103987703483262815875/Misc#)
Connector Pinout
PIN 1: OG - Courtesy Lamp Voltage
PIN 2: BN - Sunroof Switch Open Signal (C3U)
PIN 3: OG - Sunroof Switch Close Signal (C3U)
PIN 4: L-BU - Front Sunshade Switch Open Signal (C3U)
PIN 5: YE - Front Sunshade Switch Close Signal (C3U)
PIN 6: RD/WH - Battery Positive Voltage (UG1)
PIN 7: PU/WH - LED Dimming Signal
PIN 8: GY - Instrument Panel Lamp Voltage
PIN 9: GY/BK - Courtesy Lamp High Control
PIN 10: BK - Ground
PIN 11: GY - Cellular Microphone Signal (EU1)
PIN 12: BARE - Ground (EU1