Traverse Forum banner

Changing 2nd row bench to captains chairs

117K views 59 replies 28 participants last post by  samotlietuvis  
#1 ·
I am in the process of changing the 2nd row bench seat to captains chairs, as I get the time. So far, I have the 60/40 bench seat removed and the passenger side captain chair installed. I have looked up underneath the carpet and there are 4 torx screws in the floor plan on the driver's side. Once I get the time, I am going to take the measurements on the mounting rails of the driver's side captain chair and measure the spacing from the current mounting holes to the torx screws. I have pics, but will keep you updated with the progress.

Kelsey
 
#2 ·
Sounding very promising!

Several have come here asking if it can be done and have received different answers. I've said the floor stampings would have at least the indentations where the seat bolts if not even the threaded nut in place where the hold down bolts would go.

Very interested in seeing you finished pictures and what, if any, problems you encountered. Hopefully you can finish the swap soon.
 
#3 ·
im leaning to the side that the holes have to be there.

I cant see GM building 2 floor pans- captains or bench...

I can see them making 1 floor plan with all the holes ready to use--- the ones that arent used-- are capped off-- or a bolt inserted...

well see what the OP finds..
 
#6 ·
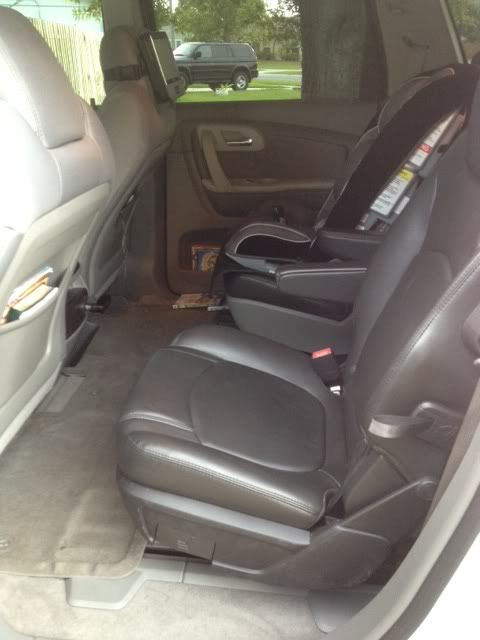
The seats are in! It is actually 3 torx screws, not 4 as I originally posted. The torx bit for the screws are a size 50 (which of course I did not have that size). I had read on this forum, as well as the links to the acadia forum, before I took on this project which everyone knows you have differing opinions on whether it could be done or not. I took pictures along the way as I was doing this, so once I am able to post pictures, I will post them write everything up. The only thing left now after "trimming" the carpet for the driver's side is to make a new carpeted floorboard between the captain's chairs and getting the new plastic inner floor trim for the chairs. Once that is complete, I will be ordering new seat plastic for the second row for when we take the Traverse to Classic Soft Trim for the leather interior. Although it wasn't that bad, I do have a few tips if I were to do it again. 1) I would probably just order the driver's side captains chair and use the 40% of the bench seat. It is the same seat without an inner armrest. 2) When you go to take out the 60% bench seat, have someone there to help you, or you just have to do like I did and man up. An eight month pregnant wife and a 2 1/2 year old do not offer that much of an assistance. 3) Have a garage (such as a 2 car garage) where you can do everything and leave everything apart if you have to, not to mention do it when the weather cools off considering I did it in mid to upper 90 degree heat here in Fl. Other than that, you cannot be afraid to just dive in. If you break something, you break it. I have broken plenty of stuff along the way, but there is no other way to find out! If anyone has any questions before I post the pictures, just let me know.

Kelsey
 
#8 ·
Jeremy,
I bought the captain's chairs on ebay from Veldman's auto parts - a salvage yard up in Indiana. They were $150 each with $100 shipping. Compared to the pricing of other seats I saw, I didn't think it was too bad. It is going to cost me almost as much for new plastic for the seats since the ones I got from ebay were ebony and our interior is titanium. I will see if I can start posting pictures this afternoon.

Kelsey
 
#59 ·
It is going to cost me almost as much for new plastic for the seats since the ones I got from ebay were ebony and our interior is titanium.
I haven't read the whole thread yet, sorry of this is repetitive.
Regarding your trim ...I just upgraded my hideous '99 crew cab radio to a double din DVD touch screen. I bought the Metra full conversion kit which comes with a completely new instrument cluster cover..in black only!

I went to the local auto paint store and they hooked me up with a spray can of interior dye that matched my interior perfectly ($17 post-covid, $13 pre-covid) .
Super easy to change the color of any interior part this way...instead of buying exact one.
Hope this helps on your next auto adventure!
 
#20 ·
Enclave09 said:
I'm actually looking to do the opposite in my Enclave. Glad I came across this. I have the captains chairs and want to put in a bench. Now if I could only find a take out Titanium color 60 split side complete. Any additional thoughts on doing the opposite?
Sure, just follow the instructions that kmorris posted in reverse! :D

I don't think it would be too much different, just have to outsource the bench seat. You are in Michigan, correct? Contact Schram auto salvage (used to be a sponsor on the Acadia board). They have two late model salvage yards in Michigan and deal very heavily with GM products.
 
#24 ·
Enclave09 said:
I'm actually looking to do the opposite in my Enclave. Glad I came across this. I have the captains chairs and want to put in a bench. Now if I could only find a take out Titanium color 60 split side complete. Any additional thoughts on doing the opposite?
I actually have a bench seat cloth titanium accent and planning to have it replaced to captain seat... Why don't we trade seats for a win win situation if u a good with the color?
 
#25 ·
Just wanted to chime in here and say that yesterday I successfully swapped the bench seats on my 2011 Traverse with bucket seats from a 2013 Enclave.

Some caveats if anyone still wants to do the same thing.

1. Try and use an impact wrench. Of all the times for mine to not work, this was it. The bolts used to keep the bench seat on the floor could not have been on any tighter and I had a helluva time getting them off manually with my ratchet. If you don't have an impact wrench I'd suggest spraying some PB Blaster catalyst on each bolt and letting it sit for while before attempting to loosen the bolts. ou may find you'll use muscles you didn't know you had.

2. You'll need to cut out some carpet on the driver side in order for the right side rails of the new seat to fit and be able to be bolted down. I recommend putting the new seat in place, then using a piece of chalk on the carpet to outline where you have to cut. Cutting the carpet will also expose the "filler" bolts in the unused holes. You'll need a Torx 50 bit to remove these bolts.

3. In total, the 2 bucket seats use 3 more floor bolts and washers than the bench seats. You can get these from your dealer, but ones from your local hardware store will suffice.

4. The plastic trim panels that go over the seat rails won't fit exactly. I needed to trim off some plastic on the underside of them with my Dremel in order for them fit. Also, if you care about how they look, the "outside" pieces...the trim pieces next to the doors work fine, but you'll need to replace the "inside" trim pieces for both seats, as the ones designed for the bench seats don't look quite right. I haven't been able to find them online so I may have go to the dealer for those.

5. Factory floor mats from the bench seats no longer fit properly.

6. There will be a "hole" in the carpet from where the old rails from the 2 bench seats met. Haven't figured out how I'm going to tackle this yet. I may just fill it with whatever foam I can find the put the weathertech floor liner over it and nobody will know the difference.

In the end, aside from getting the bolts off it was a pretty easy and straight forward job. If anyone has any questions, feel free to ask.